Monstera Deliciosa Complete Care Guide
Why Monstera deliciosa Is the King of Houseplants
Few plants command attention the way a mature Monstera deliciosa does. Those enormous, glossy leaves with their characteristic holes and splits (botanically called fenestrations) can turn an ordinary living room into something that feels like a tropical conservatory. Native to the rainforests of southern Mexico and Panama, Monstera deliciosa has been cultivated as a houseplant since the Victorian era, and its popularity has only grown in the age of social media, where its photogenic leaves appear in countless interior design feeds.
What makes Monstera so rewarding is that, despite its dramatic appearance, it is not a particularly difficult plant. It forgives the occasional missed watering, grows steadily under average indoor conditions, and reliably produces new leaves throughout the growing season. However, there is a difference between a Monstera that merely survives and one that thrives and produces those iconic split leaves. This guide covers everything you need to know to get the best out of your Monstera deliciosa.
Light Requirements: Bright but Indirect
In its natural habitat, Monstera deliciosa climbs up tree trunks in the rainforest understory, where it receives dappled sunlight filtered through the canopy above. This means the plant has adapted to bright but indirect light. In a home setting, the ideal placement is within 3 to 6 feet of a window that faces east or south. An east-facing window provides gentle morning sun followed by bright indirect light for the rest of the day, which is nearly perfect. A south-facing window works well too, but you will want to position the plant slightly back from the glass or use a sheer curtain to diffuse the intense midday rays.
Direct afternoon sunlight, especially through a west-facing window in summer, can scorch the leaves. You will notice bleached or papery brown patches on areas that receive direct sun. On the other hand, if your Monstera is in a spot that is too dark, such as a north-facing room or a corner far from any window, the plant will grow leggy with long gaps between leaves, and new leaves may emerge without the characteristic splits. A Monstera that produces only small, heart-shaped, unsplit leaves is almost certainly starved for light.
A good rule of thumb: if you can comfortably read a book in the spot without turning on a lamp during daylight hours, the light level is sufficient. If the space feels dim, your Monstera will struggle.
Watering: The Soak-and-Dry Method
Overwatering is the most common cause of Monstera problems, and the core principle is simple: water thoroughly, then let the soil dry out before watering again. Monstera deliciosa stores moisture in its thick stems and fleshy roots, so it tolerates underwatering far better than overwatering.
The best way to determine when to water is the finger test. Insert your index finger into the soil up to the second knuckle, roughly 5 centimeters deep. If the soil feels moist at that depth, wait. If it feels dry, it is time to water. During the active growing season (spring and summer), this typically means watering once every 7 to 10 days. In fall and winter, when growth slows and evaporation decreases, you may only need to water once every 2 to 3 weeks.
When you do water, do it properly. Take the plant to a sink or bathtub and pour water slowly over the entire surface of the potting mix until water runs freely from the drainage holes at the bottom. Let the pot drain completely before returning it to its saucer or decorative cachepot. Never let the plant sit in standing water, because soggy roots quickly develop root rot, a fungal condition that is difficult to reverse once it sets in.
Signs of overwatering include yellowing lower leaves, soft or mushy stems near the soil line, and a musty smell coming from the potting mix. Underwatering shows as drooping, curling leaves with crispy brown edges.
Soil and Potting Mix
Monstera deliciosa needs a growing medium that drains freely while retaining enough moisture to support steady growth. Dense, peat-heavy potting soils straight from the bag tend to compact over time and hold too much water, which is exactly what Monstera roots do not want.
A good DIY mix combines equal parts of high-quality potting soil, perlite, and orchid bark. The potting soil provides nutrients and structure, the perlite creates air pockets and improves drainage, and the orchid bark mimics the chunky, aerated substrate that Monstera roots encounter when climbing trees in the wild. If you want to simplify, a quality cactus and succulent mix amended with about 20% additional perlite also works well.
When choosing a pot, prioritize drainage holes. Terracotta pots are excellent for Monstera because they are porous and wick excess moisture away from the root zone—particularly helpful if you tend to be a heavy-handed waterer. Plastic and ceramic pots work fine too, provided they have adequate drainage.
Humidity and Temperature
As a rainforest native, Monstera appreciates humidity levels above 50%, but it adapts surprisingly well to the 30 to 40 percent relative humidity found in most heated and air-conditioned homes. If the air in your home is particularly dry during winter months, you may notice brown, crispy leaf tips. There are several ways to address this: place a pebble tray filled with water beneath the pot (ensuring the pot sits above the water line, not in it), group several plants together to create a localized humid microclimate, or use a humidifier in the room during the driest months.
Regarding temperature, Monstera deliciosa is comfortable in the same range that humans prefer: 18 to 27 degrees Celsius (65 to 80 degrees Fahrenheit). It can tolerate brief dips down to about 10 degrees Celsius (50 degrees Fahrenheit), but prolonged exposure to cold will cause leaf damage. Keep the plant away from drafty windows in winter and from air conditioning vents that blast cold air directly onto the foliage.
Fertilizing for Bigger Leaves
Monstera deliciosa is a fairly heavy feeder during the growing season. From early spring through late summer, apply a balanced liquid houseplant fertilizer diluted to half the recommended strength every 2 to 4 weeks. A formulation with an NPK ratio around 10-10-10 or 20-20-20 works well. If you prefer slow-release fertilizers, a granular product applied once in early spring and again in midsummer will provide steady nutrition without the need for regular liquid feeding.
Watch for signs of over-fertilization: brown or scorched leaf edges, a white crust forming on the soil surface from salt buildup, and wilting despite adequate watering. If you see these symptoms, flush the soil by running plain water through the pot for several minutes to leach out excess salts, then skip fertilizing for at least a month.
Do not fertilize during the winter months when the plant is not actively growing. Pushing a resting plant with fertilizer can lead to weak, spindly growth and salt accumulation in the soil.
Providing Support: Moss Poles and Staking
Monstera deliciosa is a climbing plant by nature. In the wild, it uses aerial roots to attach itself to tree trunks and climb toward the light. Without support indoors, a Monstera will sprawl outward, taking up significant floor space and developing stems that can snap under their own weight as the plant matures.
Adding a moss pole, coir pole, or cedar plank to the pot gives the plant something to climb. Position the support near the back of the main stem when repotting, and gently tie the stems to the pole with soft plant ties or strips of old pantyhose. Do not tie too tightly; the goal is guidance, not constriction. The aerial roots will eventually attach to the pole on their own, especially if the moss or coir is kept slightly moist by occasional misting.
As the plant climbs and receives adequate light, you will notice that successive leaves become larger and develop more pronounced fenestrations. A well-supported Monstera can produce leaves well over 60 centimeters (2 feet) across indoors.
Pruning and Maintenance
Monstera requires minimal pruning. Remove yellow or damaged leaves at any time by cutting the leaf stem close to the main vine with clean, sharp scissors or pruning shears. Sterilize your cutting tool with rubbing alcohol before use to prevent spreading any pathogens.
Dust accumulates on those large, glossy leaves and reduces the plant’s ability to photosynthesize efficiently. Wipe the leaves gently with a damp microfiber cloth every few weeks. Avoid commercial leaf shine products, which can clog the leaf pores (stomata) and interfere with the plant’s respiration. A damp cloth with plain water is all you need.
If your Monstera is producing many small, unsplit leaves low on the stems—often called “runners”—these can be pruned back to redirect the plant’s energy to the larger, more attractive growth higher up. This is a matter of aesthetic preference, not plant health.
Propagating Monstera deliciosa
Monstera is one of the easiest houseplants to propagate, and stem cuttings are the standard method. The key to successful propagation is taking a cutting that includes at least one node, the small bump or ridge on the stem from which roots and new leaves emerge. A cutting without a node, consisting only of a leaf and its petiole, will never develop into a new plant.
To propagate, select a healthy stem with at least one leaf and a visible node. Using a clean, sharp knife or pruning shears, cut the stem about 1 to 2 centimeters below the node. Place the cutting in a jar of clean water, ensuring the node is submerged but the leaf stays above the water line. Change the water every 3 to 5 days to prevent bacteria buildup. Place the jar in bright, indirect light.
Within 2 to 4 weeks, small white roots will begin to emerge from the node. Once the roots are at least 5 to 8 centimeters (2 to 3 inches) long, the cutting is ready to be potted into soil. Plant it in a small pot with the same well-draining mix described above, water thoroughly, and keep the soil slightly more moist than usual for the first couple of weeks as the water roots transition to soil roots.
Common Problems and Solutions
Yellow Leaves
Yellowing is most often a sign of overwatering or poor drainage. Check that your pot has drainage holes and that water is not pooling in the saucer. Allow the soil to dry more between waterings. If only the oldest, lowest leaves are yellowing, this may simply be natural leaf senescence and not a cause for concern.
Brown Leaf Edges or Tips
Brown, crispy edges typically indicate low humidity, under-watering, or salt buildup from over-fertilizing. Address the most likely cause: increase humidity, adjust your watering schedule, or flush the soil to remove excess fertilizer salts. If only the very tips are brown and the rest of the leaf looks healthy, this is often a cosmetic humidity issue rather than a serious problem.
Leaves Not Splitting (No Fenestrations)
If your Monstera is producing only solid, heart-shaped leaves, the plant needs more light. Move it closer to a bright window. Also, young Monsteras naturally produce unsplit leaves for the first year or so. Patience plays a role here; the fenestrations will come as the plant matures and receives adequate light.
Pests
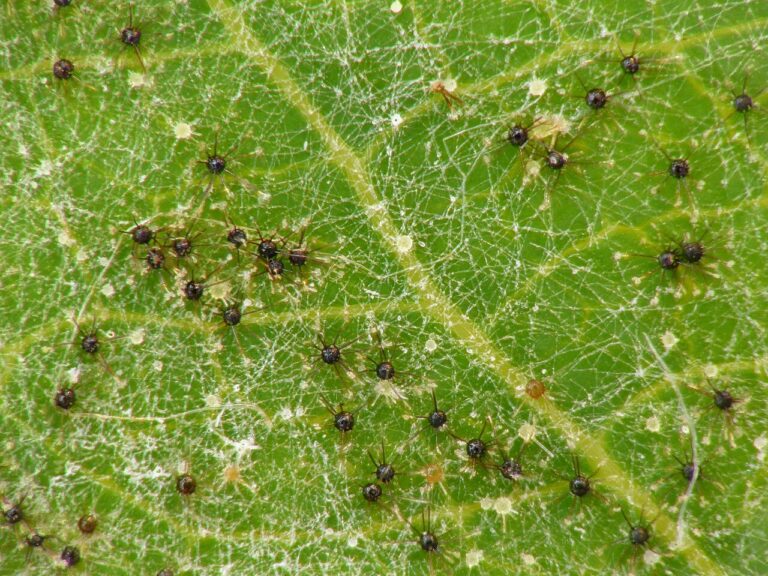
Monstera can attract common houseplant pests including spider mites, mealybugs, scale insects, and thrips. Spider mites create fine webbing on the undersides of leaves and cause a stippled, dusty appearance. Mealybugs look like small cottony masses tucked into leaf joints. Treat infestations by first physically wiping down all leaves with a damp cloth, then applying insecticidal soap or neem oil according to the product instructions. Isolate any infested plant from your other houseplants to prevent spread.
Recommended Monstera Care Products
Here are some tools and supplies that can help you care for your Monstera deliciosa:
- Moss Pole: A coco coir moss pole gives your Monstera the vertical support it needs to produce larger, more fenestrated leaves.
- Orchid Bark: Adding orchid bark to your potting mix dramatically improves drainage and aeration.
- Liquid Fertilizer: A balanced liquid houseplant fertilizer applied at half strength during the growing season promotes lush foliage.
- Pruning Shears: Clean, sharp pruning shears are essential for trimming damaged leaves and taking cuttings.
- Humidity Meter: A simple digital hygrometer helps you monitor humidity levels near your plant.